Grout Cleaning

Welcome to my Work History archive where you will find detailed examples of the cleaning and renovation of Grout carried out in Somerset

Cleaning and Renovating Grout

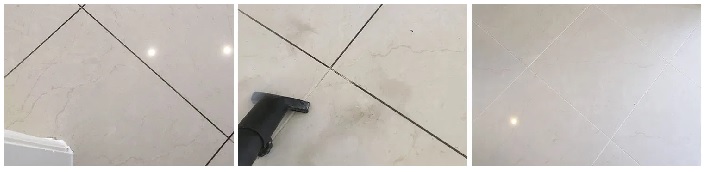
The top layer of grout is porous and can absorb grease, dirt and limescale. Spillages such as wine, lemonades or greasy substances will cause marks and patches in the joints in the floor. Grout between wall-tiles particularly in damp areas like bathrooms will become dirty and unattractive as a result of Mould, Mildew and Limescale.

Mould is one of the most unsightly problems, which usually starts off in the wettest area of the room, this could be the bottom of the shower or bath, then starts to spread and if left unchecked could cover a large area of the wall.

Another common issue we find is a problem known as Grout Haze or Grout Smearing where a thin layer of grout has been left to set on the surface of the tile. Once grout has set it is difficult to remove.

Discolouration of grout joints in bath or shower areas due to continued use of acid formulated shampoos and soaps. This causes yellow orange and pink stains to the grout over even a short period of time. Whilst Grout Joints can be cleaned, badly stained grout may need to be re-coloured.

Protecting your grout in advance with a sealer will prevent most of these issues and although relatively unknown in the UK, protection awareness is growing. Sealing forms an invisible barrier between the grout and the surface, this will then protect your investment for years to come.

We have solutions for all the problems listed above and below you will find detailed examples of work we have carried out in the past to resolve many of these issues. It should give you some idea of what’s involved and what can be achieved with the right techniques and products.


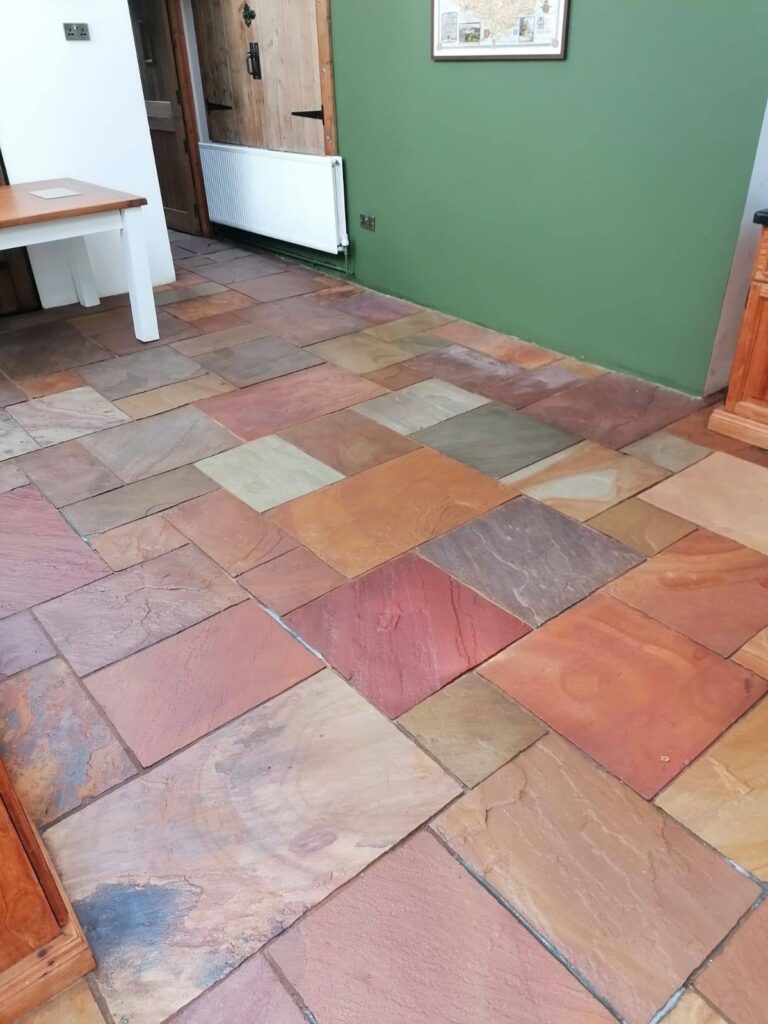
Multicoloured Slate Tiled Kitchen Floor Renovation Ilminster

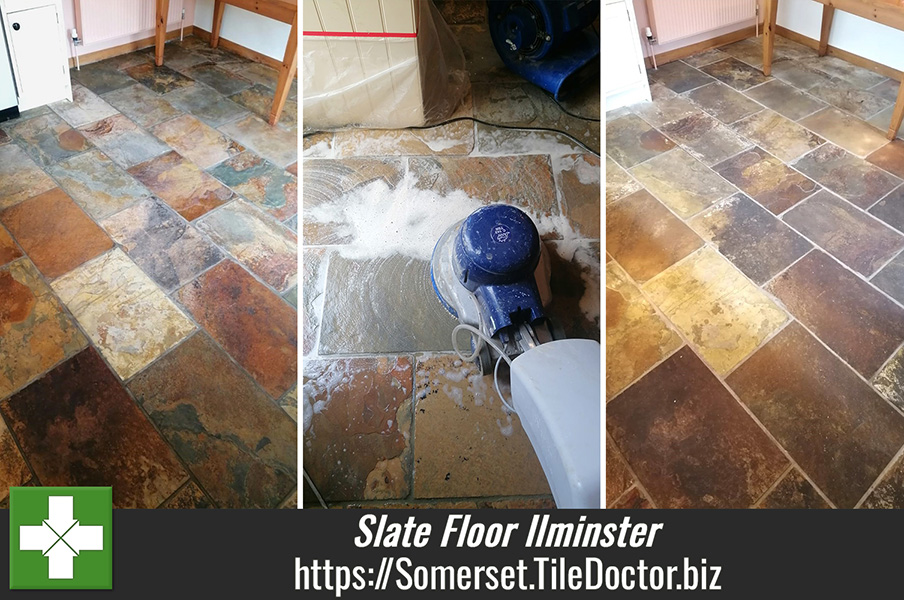
Multicoloured Slate Tiled Kitchen Floor Renovated in Ilminster

We were asked to look at a multicoloured slate tiled kitchen floor at a property in Ilminster which had been installed 22 years prior and was now proving impossible to keep clean. This is a common issue with stone floors and usually tells me that the sealer had failed resulting in dirt becoming ingrained in the pores of the tile and grout.

Multicoloured Slate Tiled Kitchen Floor Before Renovation Ilminster

I suggested resolving this with a deep clean and application of a fresh sealer; apparently some of the stone had also been flaking away so I had to wonder if they had been using a strong and unsuitable cleaning product to maintain the floor.

Having paid a visit to the property to survey the floor and take measurements I was able to reassure the owner that I would be able to restore the floors appearance and sort out the flaking stone.

A detailed quotation was sent over which was accepted and a date set.

Cleaning a Multicoloured Slate Tiled Kitchen

To remove the ingrained dirt the floor was mopped with a strong dilution of Tile Doctor Pro-Clean which was left to dwell for ten minutes. The floor was then scrubbed using black scrubbing pad attached to a Beton Ranger rotary machine. The grout lines were also scrubbed where needed using more Tile Doctor Pro-clean and a stiff hand brush.

Multicoloured Slate Tiled Kitchen Floor During Cleaning Ilminster

This process removed the flaking stone and lifted the dirt and any remaining sealer out of the stone to the surface where it was extracted with a wet vacuum. The floor was then inspected and stubborn areas spot treated as needed.

The next stage was to give the floor an acid rinse using Tile Doctor Grout-Clean Up worked into the tiles with a poly brush. Following this the floor was rinsed using water and the wet vacuum used to remove the waste and get the tiles as dry as possible.

Multicoloured Slate Tiled Kitchen Floor After Cleaning Ilminster

Sealing a Multicoloured Slate Tiled Kitchen Floor

The floor was left to dry off overnight and work resumed the next day starting with the taking of multiple moisture readings to confirm the stone was sufficiently dry. All was well so the floor was sealed using two coats of Tile Doctor Colour Grow combined with Tile Doctor X-Tra Seal. These two sealers work well on multicoloured Slate floors to bring out the colour, being impregnators, they work by soaking into the stone occupying the pores and thereby preventing dirt from becoming stuck there.

Multicoloured Slate Tiled Kitchen Floor After Renovation Ilminster

The new sealer gave the slate a whole new appearance and will ensure that dirt remains on the surface where it can be easily cleaned away going forward. On the subject of cleaning, I left the owner a bottle of our Tile Doctor Neutral Tile Cleaner which is designed for cleaning sealed tiles and won’t impact the stone or the sealer.

The owner really appreciated the work and left the following feedback:

“Lucas was efficient, friendly, knowledgeable and extremely helpful.”


Professional Restoration of a Multi Coloured Slate Tiled Flooring in Somerset

Multicoloured Slate Tiled Kitchen Floor Renovated in Ilminster Read More »
Terracotta Tiled Kitchen Floor Renovation Frome

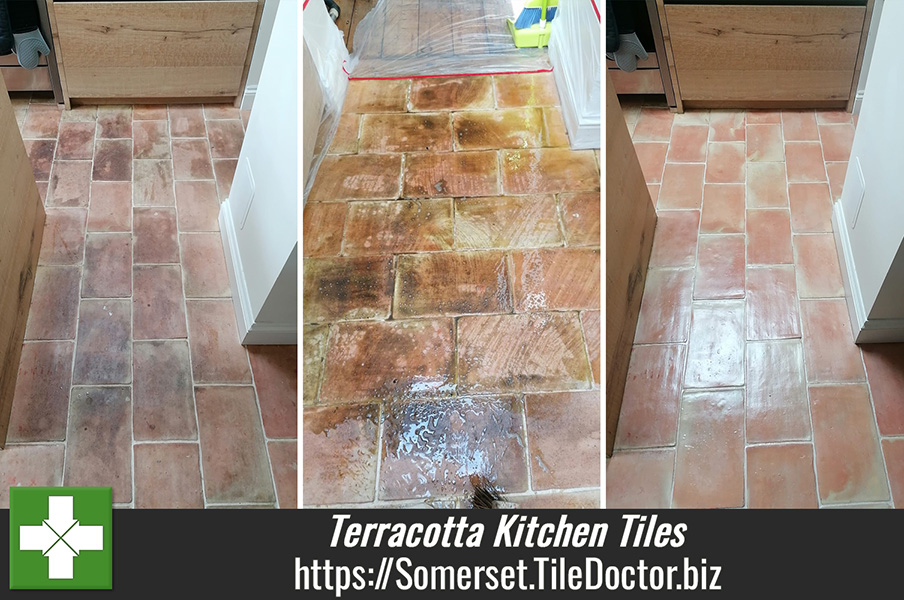
Problematic Terracotta Kitchen Floor Tile Solved in Frome

Photographed below is a Terracotta tiled kitchen floor at a property in Frome that was installed six months prior and was already proving problematic. I was asked to pop over and discuss the floor as they had been struggling to keep the tiles clean. Apparently after installation the builders offered to seal the floor, however they did not use enough sealer, so marks and stains soon started to appear. To resolve this several layers of wax were then added but this only caused more issues.

Terracotta Tiled Kitchen Floor Before Cleaning Frome

Although traditionally used as a coating for Terracotta we are not keen on wax finishes as the wax is easily scratched leaving a nice crevice for dirt to become ingrained, wax is also difficult to remove. After surveying the floor, I recommended stripping off the wax and what was left of the previous sealer, deep cleaning the Terracotta and grout and then sealing with a modern product designed for use on Terracotta which is notoriously porous.

Happy with my plan I worked out a detailed quotation for the work which was accepted and a date set for the work to start which would take two days.

Cleaning a Terracotta Tiled Kitchen

After taping up the kitchen units to protect them from splashing, work started with the application of neat Tile Doctor Remove and Go; this was allowed to dwell and soak into the floor and soften up the layers of wax. After 10 minutes the floor was scrubbed using a 240-Grit Carbide Brush attached to a rotary machine, the grout was also scrubbed at this point and on completion the floor was vacuumed.

Terracotta Tiled Kitchen Floor During Cleaning Frome Terracotta Tiled Kitchen Floor During Cleaning Frome

The next step as to treat the Terracotta to an acid rinse using Tile Doctor Grout Clean-Up worked in with a poly brush. This treatment further cleans the terracotta and neutralises efflorescent salts which can be a problem with porous clay tiles like these. Again, once done the waste was extracted using a wet vacuum.

Removing some areas of wax build-up was a struggle and the cleaning process had to be repeated two to three times before we were happy the floor was clean and free of coatings. The floor was then given a final water rinse and left to dry with a couple of air movers left in place to aid drying of the floor.

Sealing a Terracotta Tiled Kitchen

We returned 3 days later to give the floor plenty of time to dry, several moisture readings were also taken on arrival to confirm the Terracotta was dry and ready to seal. Having previously discussed sealers it was clear the client wanted the floor to have a bit of shine and so I recommended Tile Doctor Seal and Go Extra. Terracotta is very porous, so it took six coats of Tile Doctor Seal and Go Extra before it was fully sealed.

You can see from the photographs how much lighter and cleaner the floor looked after the work was complete making a significant difference to the kitchen. For aftercare we left a complimentary bottle of Tile Doctor Neutral Tile Cleaner which is a mild yet effective product we recommend for cleaning sealed floors.

Terracotta Tiled Kitchen Floor After Renovation Frome Terracotta Tiled Kitchen Floor After Renovation Frome

My client was very happy with the improvement and left the following feedback:

“Lucas was fantastic. Explained everything in detail, was patient with all the questions and has done an amazing job with the floor. Highly recommended.”


Professional Renovation of a Terracotta Tiled Kitchen Floor in Somerset

Problematic Terracotta Kitchen Floor Tile Solved in Frome Read More »

Micro-Porous Porcelain Tiled Floor Renovation Taunton

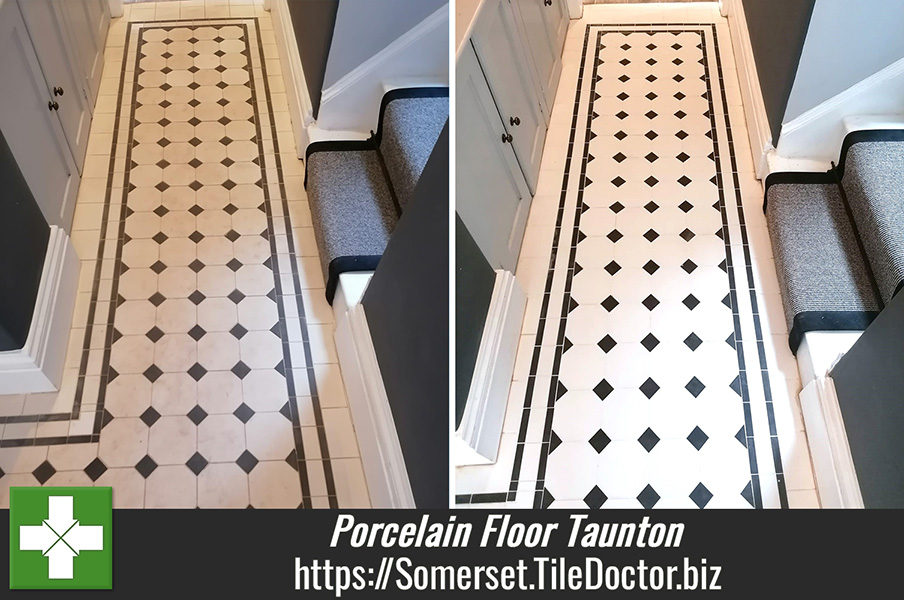
Newly Laid Micro-Porous Porcelain Turning Brown in Taunton Somerset

This client from Taunton had an expensive porcelain tiled floor installed in the hallway and WC, however after a month or two the tiles were literally turning brown and had become very difficult to keen clean. Unsure what the cause could be and having had little help from the supplier we were asked to come round and rectify the situation.

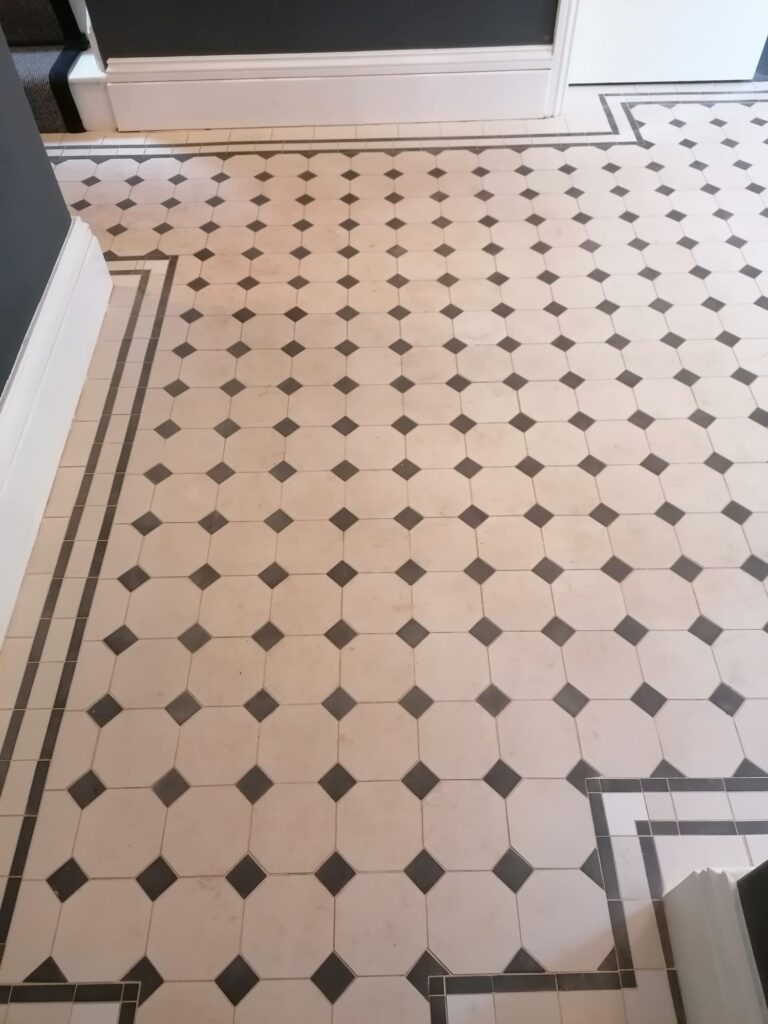
Micro-Porous Porcelain Tiled Floor Before Cleaning Taunton

I popped into survey the floor and quickly diagnosed that the tiles were of the micro-porous type and should have been sealed to keep the dirt out of the floor. Hallways see a lot of foot traffic and without a sealer the tiles had quickly become ingrained with dirt. I carried out a test clean by hand on a small part of the floor, and they came up a brilliant white. This small section really stood out against the rest of the floor and illustrated perfectly how much dirt had been absorbed into the tile in such a short period.

Micro-Porous Porcelain Tiled Floor Test Clean Taunton

Relieved to have found the solution I was asked to quote for cleaning and sealing the whole floor. The quote was accepted and a date set for the work to start.

Deep Cleaning a Micro-Porous Porcelain Tiled Hallway

The floor cleaning work started with a dilution of Tile Doctor Pro-Clean left to soak in for ten minutes and then scrubbed in using a black pad. This made an impact however it quickly became apparent that more work was needed. For maximum impact I decided it had to be done by hand using more Pro-Clean and smaller six-inch black pads fitted to a hand buffer which we found gives a more thorough clean. During this process a wet vacuum was used to remove the soiling from the floor.

Once the tiles were clean attention turned to the grout lines which were scrubbed using more Pro-Clean and a stiff brush until it was as clean as possible. Once complete, the floor was looking better and given a rinse with water which was then extracted with the wet vacuum.

Next the floor was given and acid rinse using Tile Doctor Grout Clean-Up, this further cleans the tiles, removes grout smears and neutralises the floor after the use of Tile Doctor Pro-Clean which is a strong alkaline. Afterwards the floor was rinsed and extracted again followed by final water rinse and dried as much as possible with the wet vacuum.

Sealing a Micro-Porus Porcelain Tiled Hallway Floor

Once the floor was dry it was sealed using a single coat of Tile Doctor Ultra-Seal which was applied using a cotton cloth. Ultra-Seal is a premium impregnating sealer that doesn’t alter the appearance of the tile, it soaks into the tile occupying the pores and thereby preventing dirt from residing there. The sealer will ensure dirt remains on the surface where it can be easily cleaned away using Neutral Tile Cleaner. It’s important to use a PH neutral cleaning product on a sealed floor as stronger products can reduce the life of the sealer.

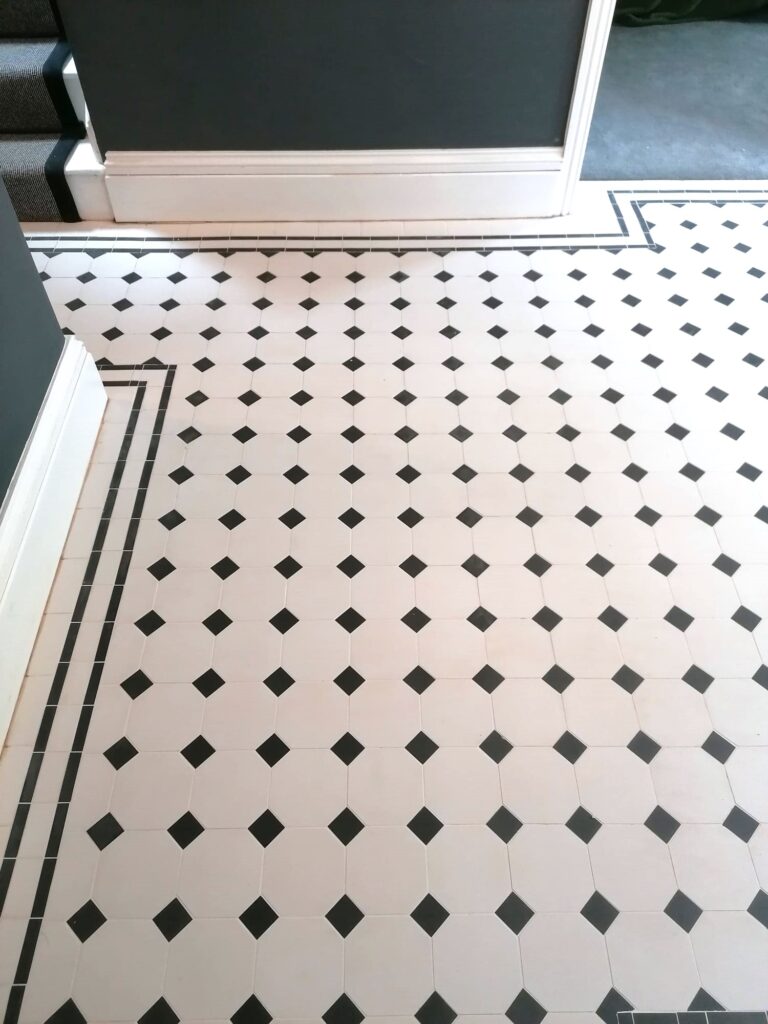
Micro-Porous Porcelain Tiled Floor After Cleaning Taunton

Once complete the floor looked so much cleaner and whiter much to the relief of our client who left the following feedback:

Lucas was very professional, and they both worked really hard and did an amazing job on the tiles. We were so pleased at how the tiles came up. It exceeded our expectations. I would thoroughly recommend them. You will not be disappointed.

For aftercare cleaning I left the client with a complementary bottle of Tile Doctor Neutral Tile Cleaner.


Professional Restoration of a Porcelain Tiled Hallway in Somerset

Newly Laid Micro-Porous Porcelain Turning Brown in Taunton Somerset Read More »

Slate Tiled Kitchen Floor Renovation Wiveliscombe

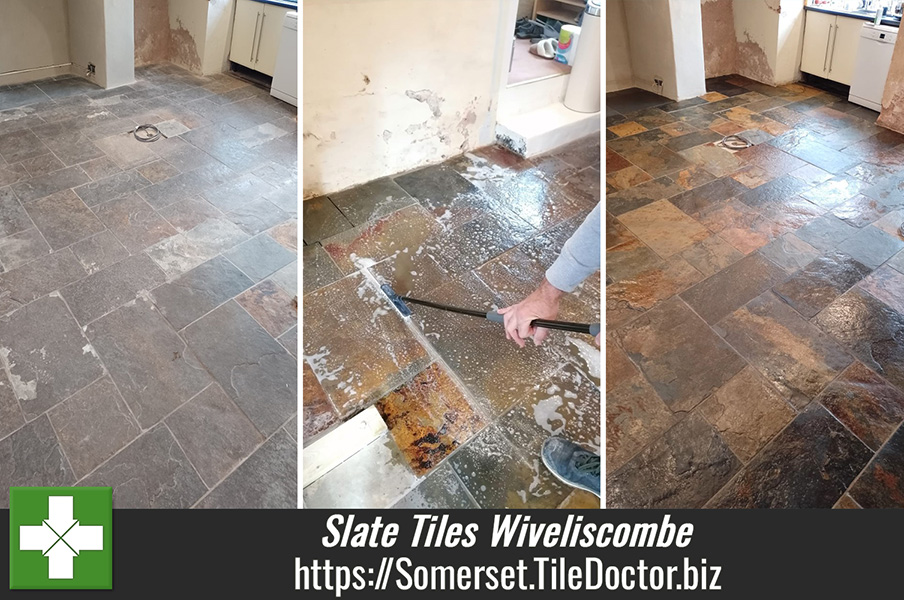
Slate Tiled Kitchen Floor Renovated in Wiveliscombe

This client had recently purchased a property in the market town of Wiveliscombe and decided to replace the kitchen units which sat on a Slate tiled floor. The customer had looked at cleaning the slate themselves but simply couldn’t get is clean enough and so decided to work in a visit from Tile Doctor between the removal and the installation.

Slate Tiled Kitchen Floor Before Cleaning Wiveliscombe

I went over beforehand to survey the tiles and work out a price for the work. The Slate was holding a lot of dirt so it was clean any previous sealer that would have prevented this had failed and needed stripping off and replacing. There were also sections where the stone was flaking leaving it rough.

I worked out a detailed quote for deep cleaning the tile and grout and then sealing. The quote was accepted and I managed to shuffle a few appointments around so I could start work before the installation of the new kitchen.

Cleaning and repairing a Slate Tiled Kitchen

To clean the tile and grout and remove any remaining sealer a strong dilution of Tile Doctor Pro-Clean was left to soak into the stone for roughly ten minutes. This gives the product time to breakdown the dirt. The floor was then scrubbed using a hard wearing 120-grit Silicon Brush attached to a rotary buffer which also helped to remove the loose flaking stone. The combination of Pro-Clean and brush pulled the dirt out of the stone into the solution where it was removed using a wet vacuum.

After reviewing the slate tile and grout more Pro-Clean was used to spot clean any stubborn marks using hand tools and a grout brush run along the grout lines until clean. The soiling was then extracted again using more water and the wet vacuum.

Slate Tiled Kitchen Floor During Cleaning Wiveliscombe Slate Tiled Kitchen Floor Grout Cleaning Wiveliscombe

Next step was to give the floor an acid rinse using Tile Doctor Grout Clean-up, this helps clean the tiles further and neutralises the ph level of the floor after the use of Pro-Clean which is alkaline. The floor was then given a final rinse with water and dried as much as possible using a wet vacuum.

Sealing a Slate Tiled Kitchen

The floor was left to dry off fully overnight and then next day checked with a damp meter to make sure it was dry enough for sealing. The moisture level was within tolerance so we were able to get on applying the sealer. It’s important to check for moisture as applying a sealer to damp tiles can result in a patchy appearance.

To seal the floor Tile Doctor X-Tra Seal was mixed with Colour Grow to make it more workable and improve colour before applying it to the floor and then buffing off the excess. Both sealers are impregnators that soak into the stone occupying the pores and thereby preventing dirt from becoming ingrained into the tile. This ensures dirt remains on the surface where it’s easy to remove.

Slate Tiled Kitchen Floor After Cleaning Sealing Wiveliscombe

Once complete the colours in the Slate really shone through and along with the grout looked so much cleaner. For aftercare cleaning I left the customer with a complementary bottle of Tile Doctor Neutral Tile Cleaner, they were really pleased with the transformation and left the following feedback:

‘Brilliant job, our slate floor has been transformed and the final look exceeded all expectations, so very happy!’


Professional Restoration of a Slate Tiled Kitchen Floor in Somerset

Slate Tiled Kitchen Floor Renovated in Wiveliscombe Read More »

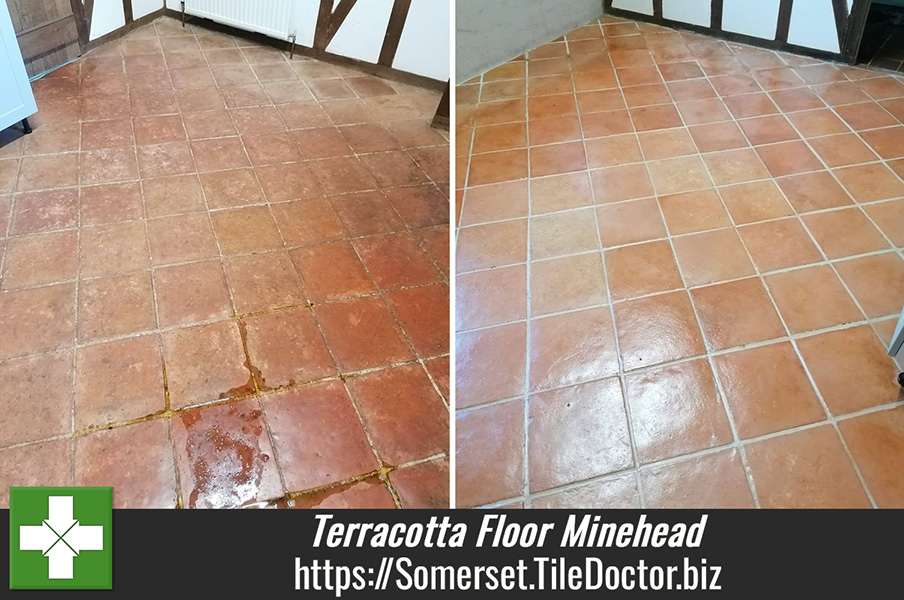
Terracotta Floor Restoration Minehead

Terracotta Kitchen Floor Tile and Grout Revived in Minehead

This client from Minehead got in touch regarding the Terracotta tiles on their kitchen floor. I was told that the floor hadn’t been professionally cleaned and sealed for over ten years and since that time the grout had discoloured and the tiles had become permanently dirty and difficult to clean.

Terracotta Floor Before Cleaning Sealing Minehead

I had a good idea of what the floor would need but to ensure there were no surprises I arranged an appointment to visit the property and survey the floor. This would also enable me to work out a detailed price for deep cleaning the terracotta tiles and grout and then sealing it. It was clear that the previous sealer had worn off some time ago and now dirt was making its way into the pores of the terracotta and grout leaving it looking permanently dirty. This is quite common with terracotta; being made from clay it is very porous and does need a lot of sealer to prevent that from happening.

Happy with my quote I was given the go ahead to renovate the floor and a date was agreed for the work to start which typically takes two days, one to clean and one to seal.

Cleaning a Terracotta Tiled Kitchen

To clean the floor, I started with an application of neat Tile Doctor Remove & Go. This was left to soak in for ten minutes and then scrubbed into the floor using a coarse Silicone Carbide brush fitted to a rotary machine. These brushes are very effective on tile and stone and do a good job of bringing the ingrained dirt to the surface.

The brush does a good job of cleaning the grout but for the best result I find it necessary to follow up with a stiff grout brush. Once the whole floor had been treated in this manner it was rinsed with water and the soiling extracted using a wet vacuum.

The floor was then treated to an acid wash using Tile Doctor Acid Gel which was then scrubbed into the floor using a black pad. This process further cleans the tiles, dissolves any efflorescent salts and neutralises the pH level of the floor after the use of Tile Doctor Remove and Go which is a strong alkaline. The floor was then rinsed again with water and dried with the wet vacuum.

Sealing a Terracotta Tiled Kitchen

The next step would be to seal the floor however with Terracotta being so porous I decided to leave the floor for two days to allow it to fully dry out. After checking the floor was dry with a moisture meter work began to seal the floor using Tile Doctor Seal and Go Extra.

Terracotta Floor After Cleaning Sealing Minehead

Sealing the floor prevents dirt from becoming ingrained in tiles, keeping it on the surface where it can be easily cleaned away and Seal and Go Extra adds a nice subtle sheen to the tile improving its appearance and enhancing its colour and features. Six coats were needed to ensure it was fully sealed and provide long lasting protection.

You can see from the photographs on this page how well the floor came out. My client was delighted with the results and said we had transformed their kitchen.

For aftercare cleaning I recommended using Tile Doctor Neutral Tile Cleaner which is a sealer safe tile and grout cleaner that won’t impact the sealer increasing its longevity.


Professional Restoration of a Terracotta Tiled Kitchen in Somerset

Terracotta Kitchen Floor Tile and Grout Revived in Minehead Read More »

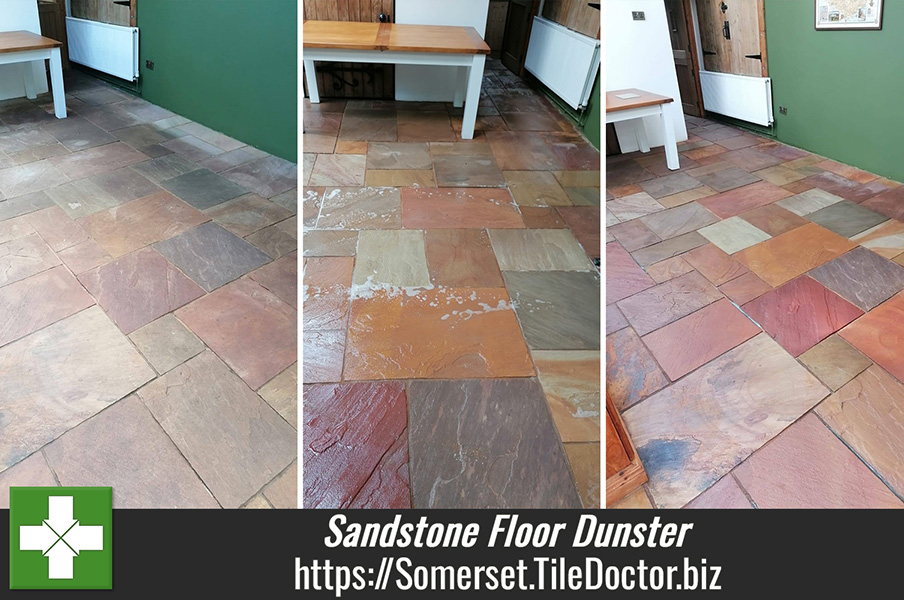
Sandstone Floor Restoration Dunster

Old Sandstone Kitchen Floor Rescued in Dunster

A homeowner from Dunster was in touch earlier this year regarding the Sandstone floor in the kitchen of the property they had just purchased. The property used to be a former Magistrates Courthouse and had been converted and having just moved in, they wanted something done to improve the appearance of the stone floor.

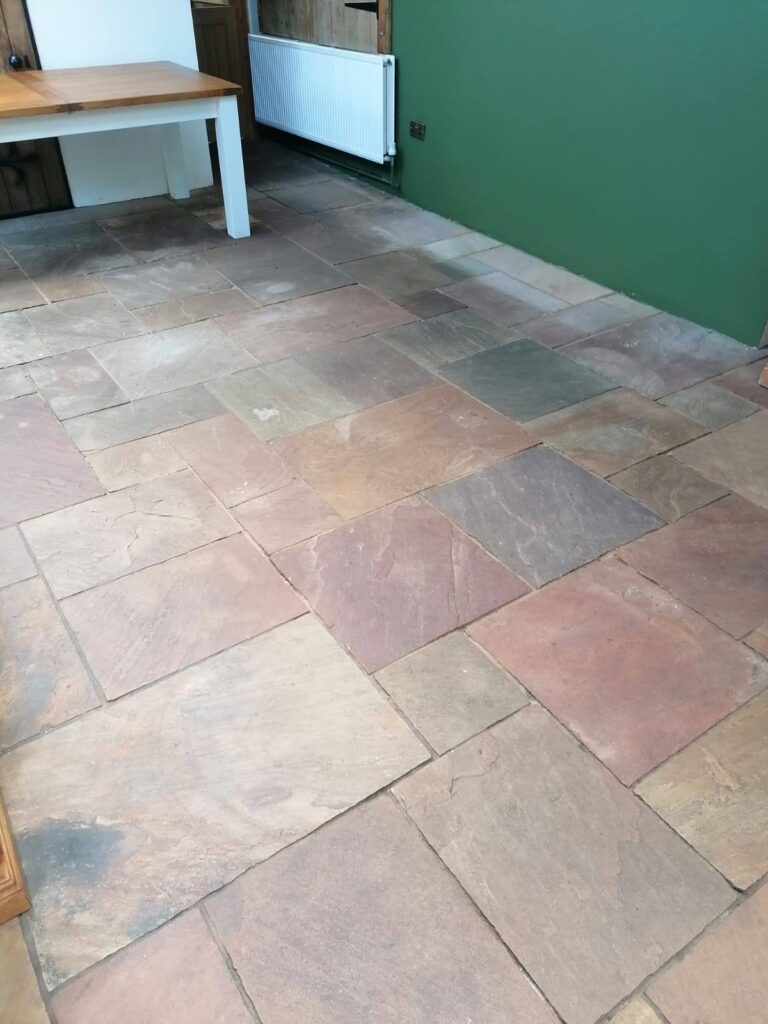
Sandstone Floor Before Cleaning Dunster

You can see from the photograph on this page that years of use had drained the colour out of the tiles leaving it looking dirty and featureless. They thought perhaps that the floor was beyond saving and needed to be fully replaced but wanted my advice first.

I attended the property to conduct a survey and performed a test clean on an inconspicuous area of flooring. I wanted to see which products would work best and give the clients and idea of what could be achieved. The test went well, and they were impressed. I took some measurements and provided a detailed breakdown of the costs. This was gladly accepted, and we scheduled the dates.

Cleaning and Restoring a Sandstone Tiled Kitchen

Upon my arrival, all the furniture had been removed so I was able to begin straightaway with the raking out of loose grout and replacing with new to ensure the floor was structurally sound before proceeding with the cleaning.

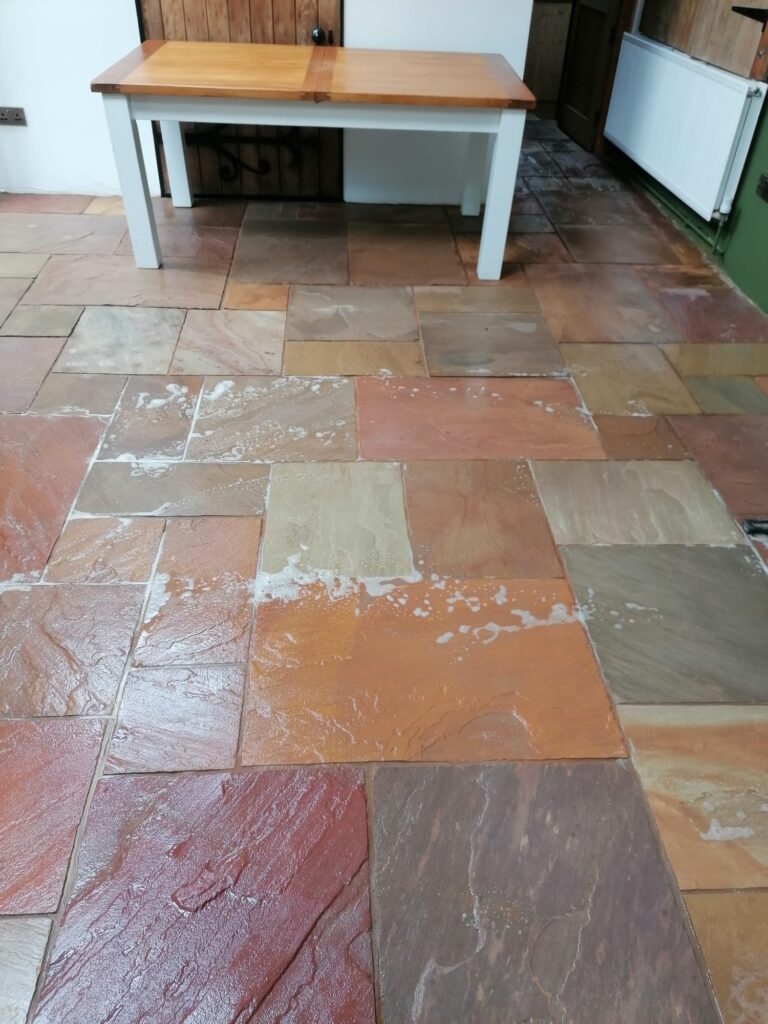
Once the grout had dried, a strong dilution of Tile Doctor Pro-Clean was mopped onto the floor and left to soak in to the stone and grout. This gives the product time to breakdown the dirt in the stone. After about fifteen minutes the floor was scrubbed using a coarse silicon carbide brush fitted to a rotary machine. These pads work nicely on stone and get into the crevices of the stone and grout lines bringing the dirt to the surface and giving the floor a deep clean. The now dirty cleaning solution was then rinsed with water and extracted with a wet vacuum.

Sandstone Floor During Cleaning Dunster

Next step was to check the floor over and spot clean any stubborn areas that needed further attention.

Next a dilution of Tile Doctor Grout Clean-up was applied to the floor and scrubbed in using a poly brush. This product is acidic as works to neutralise the floor following the use of Tile Doctor Pro-Clean which is a strong alkaline, it also further cleans the stone to remove any mineral deposits left from grout or alkaline salts which can be a problem with old floors. Once the floor had been scrubbed the solution was then extracted as before using the wet vacuum. The floor was left to dry overnight.

Sealing a Sandstone Tiled Kitchen

The next day the floor was checked for moisture with a damp meter to ensure it was dry and ready for sealing. All was well so the first of two coats of Tile Doctor Colour Grow was applied to the floor. This product was chosen as it contains a colour enhancer that helps to bring out the natural colours in the stone, also it’s fully breathable which is an important consideration when choosing a sealer for an old floor that won’t had a damp proof membrane.

Sandstone Floor After Cleaning Dunster

The floor was transformed by the clean and seal and looked much cleaner and brighter. I’m please to say the client was delighted with the results and said we had transformed their kitchen. That was great to hear as they won’t be looking to replace the floor anytime soon and it felt like we had rescued the floor and given it a new lease of life.

For aftercare cleaning I recommended the use of Tile Doctor Neutral Tile Cleaner, which is a gentle, yet effective tile cleaning product especially formulated for use on sealed floors.


Professional Restoration of a Sandstone Tiled Kitchen in Somerset

Old Sandstone Kitchen Floor Rescued in Dunster Read More »
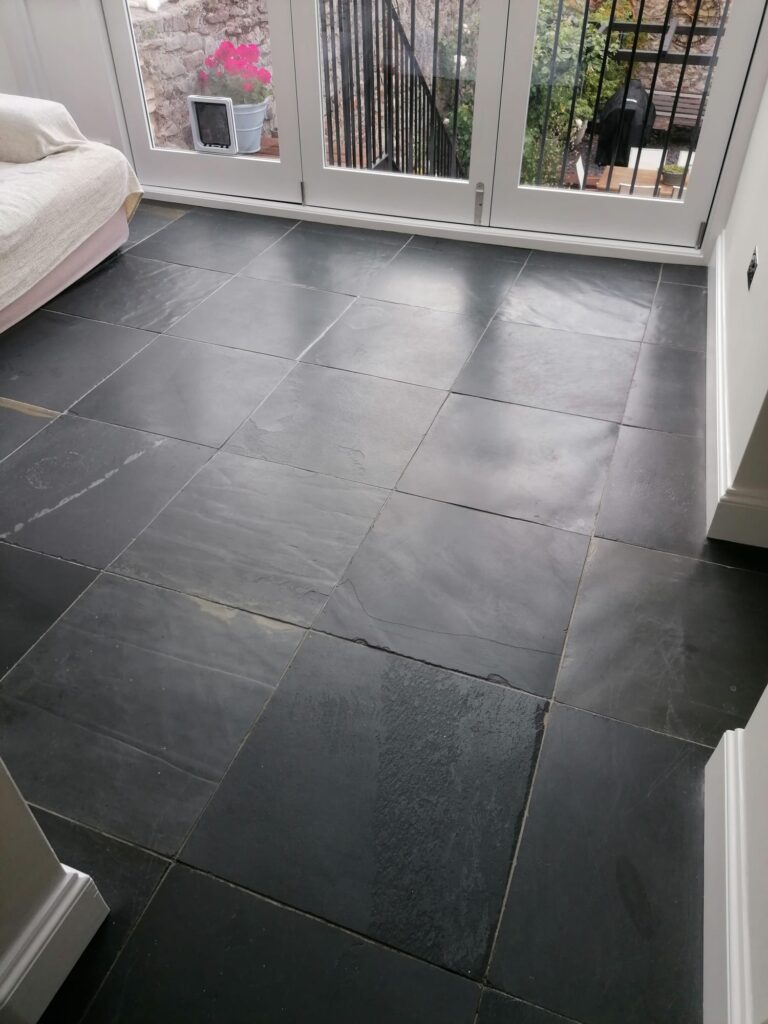
Black Slate Tiled Conservatory Floor Renovation Clifton Bristol

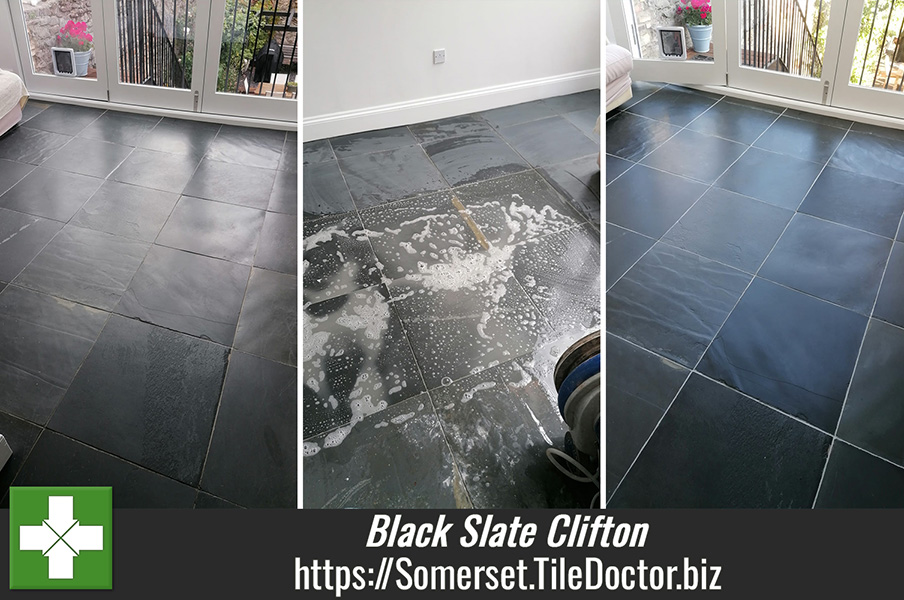
Black Slate Tiled Conservatory Floor Renovated in Clifton

The photos below are of a Black Slate floor that was installed in the Conservatory and Kitchen of a property in Clifton Bristol. Overall, the floor was not in a bad condition, however the grout had become loose, and was missing in areas. It had been several years since the floor had been sealed, and therefore our customer felt it would be best to tackle the grout, clean the floor and reseal it all together.

Black Slate Tiled Conservatory Floor Before Cleaning Clifton Bristol

I attended the property to conduct a survey and chose a small inconspicuous area to perform a test clean. I like to do a test clean as it determines which products have the most impact and shows the customer the result that can be achieved. I took measurements and worked out a detailed breakdown of the costs including grout replacement and grout colouring where required. This was gladly accepted, and we scheduled the dates.

Deep Cleaning a Natural Black Slate Tiled Conservatory Floor

Upon my arrival, all the furniture had been removed and the floor was clear so I was able to make a start on the loose grouting. This must be done carefully to avoid damaging the Slate tiles. With the grouting removed and cleared away I prepared the new grout which and applied it to the areas where it was required.

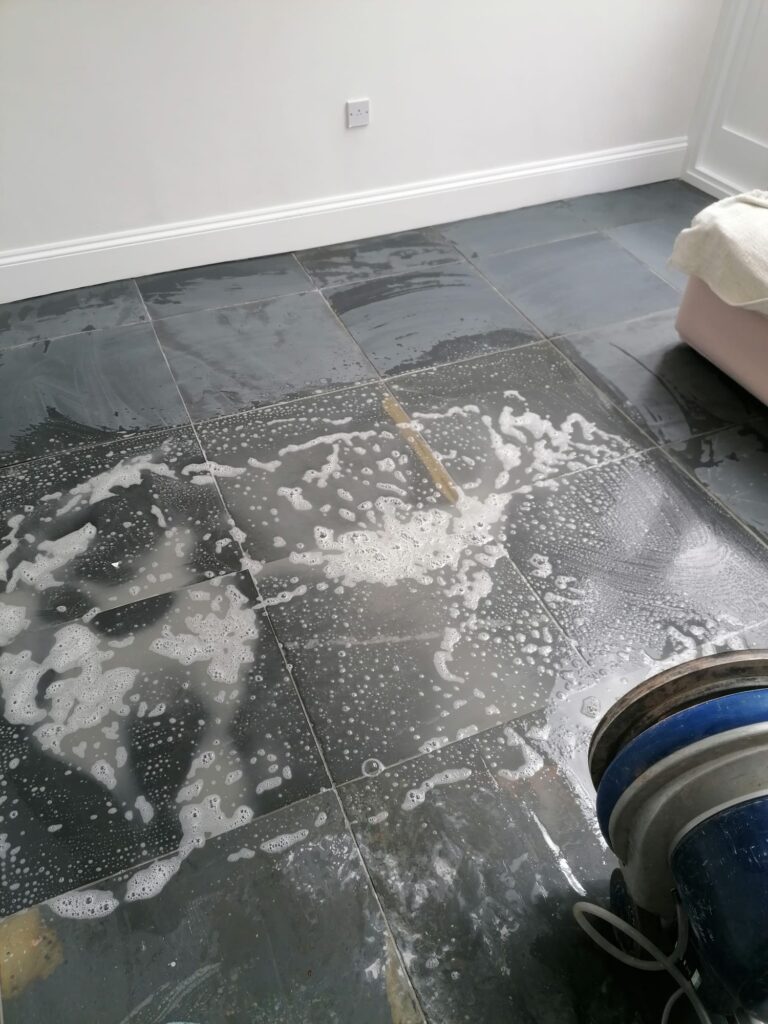
Once the grout has set attention moved to cleaning the floor with a strong solution of Tile Doctor Pro-Clean. This was applied to the surface and left to soak in so it could get to work breaking down the dirt and old sealer. After about ten minutes the solution was scrubbed into the floor using a black pad fitted to a rotary buffer. The grout was then scrubbed using more Pro-Clean and a grout brush, then once done the soiling was extracted using a wet vac.

Black Slate Tiled Conservatory Floor During Cleaning Clifton Bristol

The customer wanted some shine to her floor, so I had suggested honing the stone with burnishing pads to add a deep polish. To do this three burnishing pads were run over the floor starting with a coarse 400-grit, then 800-grit and finishing with a 1500-grit. The pads are applied using the buffing machine using only water for lubrication. After each pad the floor is rinsed and the soiling extracted with the wet vacuum as before.

Once done the floor was inspected and after reviewing the grout lines it was decided that grout colouring would be needed to achieve a consistent appearance.

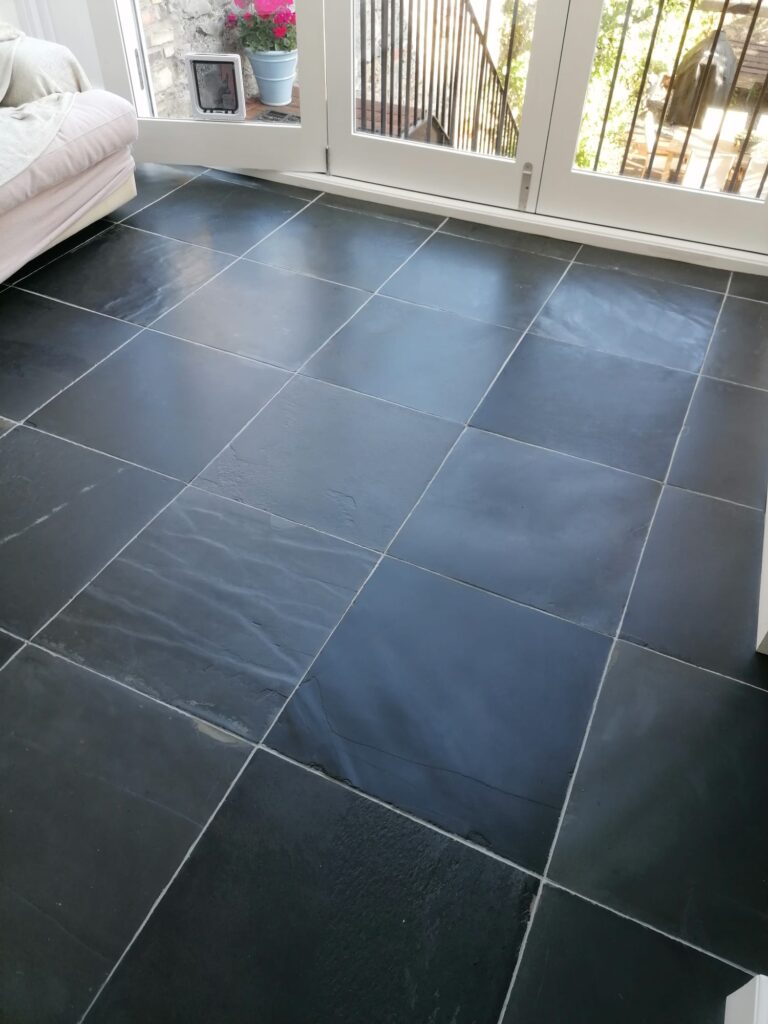
The floor was allowed to dry off overnight and word resumed the next day starting with sealing the Slate. To achieve the best result for the Slate two Tile Doctor sealers namely X-Tra Seal and Colour Grow were mixed together and applied to the floor. This combination wors well on Black Slate and really enhances the deep dark colouring in the stone. Two coats were applied left to soak into the stone and then the excess polished off by hand.

Once the sealer had dried, I set about applying the Grout Colourant using a Tile Doctor colourant in light grey. The colourant is basically painted onto the grout with a small brush and any excess wiped off the tile. This grout colourant gives the grout a uniform appearance and adds an impenetrable barrier over the grout sealing it in and keeping it safe from further staining.

Black Slate Tiled Conservatory Floor After Renovation Clifton Bristol

The customer was delighted with the results and said we had transformed their kitchen.

For aftercare cleaning I recommend the use of Tile Doctor Neutral Tile Cleaner which is a gentle but effective cleaner that won’t harm the sealer. Many of the floor cleaning products you find in supermarkets etc are not for use on sealed stone, they contain strong chemicals such as bleach etc which will strip off the sealer prematurely so best avoided.


Professional Renovation of Black Slate Tiled Conservatory Floor in Bristol

Black Slate Tiled Conservatory Floor Renovated in Clifton Read More »

=================================

Somerset Tile Doctor

================================= Read More »

Scroll to Top